
A couple months ago I was looking for a project to start for my new Raspberry Pi. As soon as I saw the video after the jump I knew what had to be done.
Backlights! for your TV. This experience is only offered on some pricey high end phillips tvs that don't seem to be available in America., it's also available to us tinkerers for less than $125.
I'm currently on Windows 8, so if you're running Linux or Mac you'll need to substitute certain programs out like PuTTY for SSH.
Software:
Hardware:
- WS2801 LED Strand (50pc) or more
- 5-Port Switch
- 5v 3amp(min) DC Power Supply
- 4Gb Class 10 SD Card
- Raspberry Pi
- Breadboard
- Male to Female .1" 2.43'mm Jumper Cables
- Wire Cutters
- Electrical Tape
- Zip Ties
- Multimeter
- (optional) 5v MicroUSB Power
- (optional) HDMI to VGA adapter
Download the latest image of Occidentalis and install it onto our Raspberry Pi. This OS doesn't necessarily need to be used but it will make things easier. With this image the Pi can be powered on by the GPIO pins, which will be required later, it also contains some of the packages required by boblight to communicate with those pins.
Connect the Ethernet Cable, SD Card, and lastly the MicroUSB power to the Pi.
If the OS was installed correctly this should start the boot process.
NOTE: This is a headless OS. Meaning there is no GUI by default. Our intention is to turn the machine on and "use it" over the network from your main PC. There will be no monitors or TVs attached to the raspberry pi driving the lights.
Once Occidentalis is installed we'll need to SSH into the Pi and configure it. (Assuming you're connected to the network via ethernet)
This can be done fairly easily if you have a keyboard connected to the Pi log in with the default login. Otherwise I will usually logon to my router to check connected devices.
User: pi
Password: raspberry
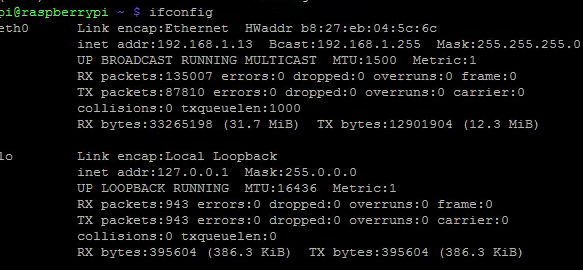 ifconfig
you'll notice inet addr: 192.168.1.13
this is your Pi's IP Address.
If we open up PuTTY we'll be able to connect to the address above.

I've made it a habit to immediately run updates/upgrades
sudo apt-get install update
sudo apt-get install upgrade
Our next step is installing the adafruit Raspberry Pi WebIDE
paste the following command:
curl https://raw.github.com/adafruit/Adafruit-WebIDE/alpha/scripts/install.sh | sudo sh
Go grab a beer and wait for the install script to finish.

Once completed you'll be able to access http://raspberrypi.local and your Raspberry Pi is now fully prepared to program LEDS from a browser!
In Part 2 we'll talk about power distribution, light painting, breadboards, and we'll connect those LEDS!
Hey, any update on this? I am looking to do the same thing... I was following the tutorial on http://code.google.com/p/boblight/wiki/LPD8806_on_Raspberry_Pi but unsure how to wire them for WS2801 any advice?
ReplyDeletejust posted an update!
ReplyDelete